How to Run NVIDIA® Jetson™ Inference Example on Forecr Products (Installation + ImageNet)
WHAT YOU WILL LEARN?
1- How to setup the system for image recognition program using jetson-inference?
2- How to recognize and classify an image using imageNet form pictures and videos?
3- How to write your own image recognition program using C++ or Python?
ENVIRONMENT
Hardware: DSBOX-N2
OS: Jetpack 4.5
In this blog post, we are going to explain how to classify images on Jetson™ Nano™ using jetson-inference. The GitHub post from dusty-nv will be taken as reference for the whole process.
How to Run the Docker Container
In this project, we will use the pre-built docker container from
https://github.com/dusty-nv/jetson-inference
It is also possible to build the project from the source, but it will take more time.
First, we should clone the files in the project.
git clone --recursive https://github.com/dusty-nv/jetson-inference
By going into jetson-inference directory that created, we must run the container.
cd jetson-inference
docker/run.sh
Docker container will automatically run and pull all the files, it will take few minutes depending on the network. This is the first setup and will only be done once.
Then, we must build the container.
docker/build.sh
Then we are good to proceed to next step.
How to Build the Project from Source
If you decide not to use Docker container, you can install and build the project directly using the following commands.
First, clone the jetson-inference project similar to the Docker Container.
git clone https://github.com/dusty-nv/jetson-inference
cd jetson-inference
git submodule update –init
Next, to download all the necessary files, and build the project create a folder called build and run cmake.
cd jetson-inference
mkdir build
cd build
cmake ../
Then, Model-Downloader tool will run automatically on the screen. This project comes with various pre-trained network models, you can choose which one(s) to download.
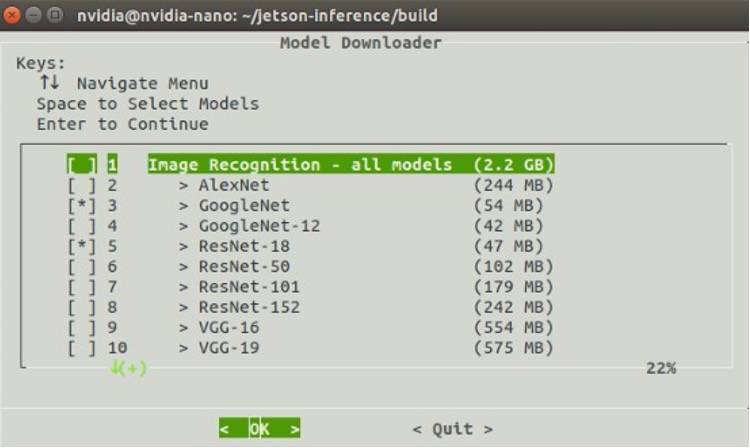
You can also re-run Model-Downloader tool later using the following command.
cd jetson-inference/tools
./download-models.sh
Then, PyTorch Installer will appear on the screen. PyTorch is used to re-train networks and we will not need it in this project, so you can skip this part.

To compile the project at the end, run the following commands while in the build directory:
make
sudo make install
sudo ldconfig
How to Classify Images with Image
Now, we will test the ImageNet program on sample images to classify.
First option:
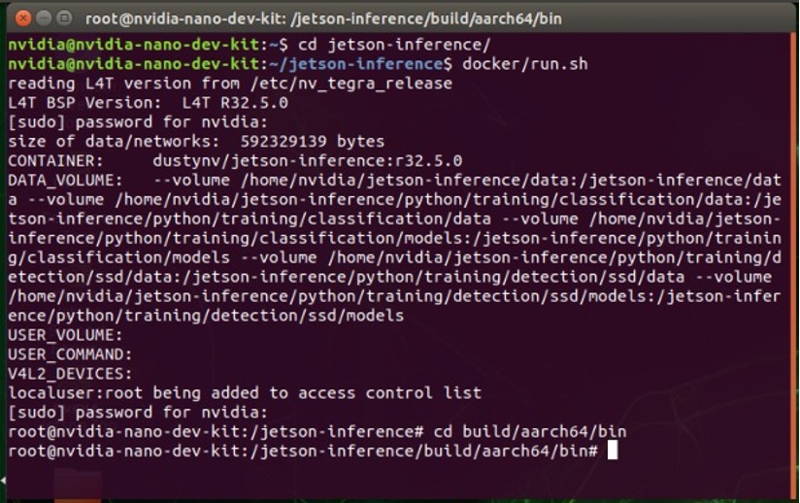
If you used Docker container, go to the following directory.
cd jetson-inference
Then, run the docker file.
docker/run.sh
Go to build directory
cd build/aarch64/bin
Second Option:
If you built the project from the source, go to the following directory directly.
cd jetson-inference/build/aarch64/bin
Next step is same for both options. Using ImageNet program written in both C++ and Python codes inside the docker container, classify sample images. You can also add your images to the data/images directory under jetson-inference. Supported image formats are JPG, PNG, TGA, BMP, GIF, PSD, HDR, PIC, and PNM (PPM/PGM binary).
To test only one image and save it on the test directory following codes can be used:
./imagenet images/dog_2.jpg images/test/dog_2.jpg
OR
# Python
./imagenet.py images/dog_2.jpg images/test/dog_2.jpg

To test multiple images:
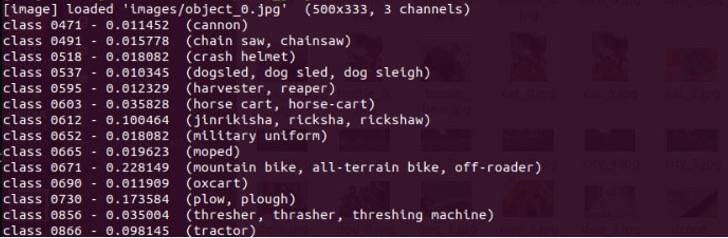
./imagenet "images/object_*.jpg" "images/test/object_%i.jpg"
OR
# Python

./imagenet.py "images/object_*.jpg" "images/test/object_%i.jpg"
We can also classify images from a video. Supported video formats are MP4, MKV, AVI, and FLV.
You can either download a sample video to jetson-inference directory by hand or by the following code:
wget https://nvidia.box.com/shared/static/tlswont1jnyu3ix2tbf7utaekpzcx4rc.mkv -O jellyfish.mkv
Then using the same code, you can run the imagenet program and save it on the test directory.
./imagenet jellyfish.mkv images/test/jellyfish.mkv
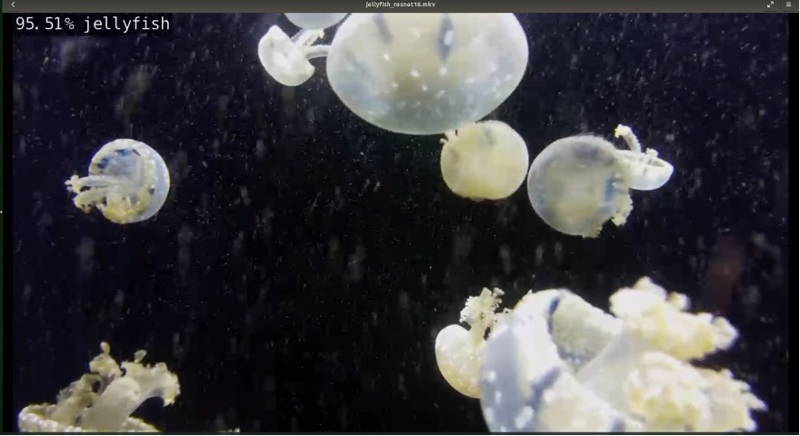
Imagenet uses GoogleNet as the default training program. You can also use different networks as in the example below.
./imagenet --network=resnet-18 images/jellyfish.jpg images/test/output_jellyfish.jpg
How to Code Your Own Image Recognition Program with C++
You can also create your own image recognition program similar to the ones come with the Jetson-inference project.
First, create a directory to the location you want in the terminal. In this example, we will create a directory named my-recognition in the home. Create C++ codes named my-recognition.cpp and CMakeLists.txt to make compiling easier.
mkdir ~/my-recognition
cd ~/my-recognition
touch my-recognition.cpp
touch CMakeLists.txt
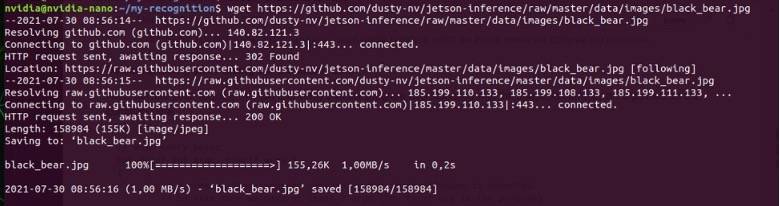
Then, download images using wget command. Here we downloaded three sample pictures.
wget https://github.com/dusty-nv/jetson-inference/raw/master/data/images/black_bear.jpg
wget https://github.com/dusty-nv/jetson-inference/raw/master/data/images/brown_bear.jpg
wget https://github.com/dusty-nv/jetson-inference/raw/master/data/images/polar_bear.jpg
You can now open my-recognition.cpp with a text editor.
Include headers in jetson-inference for image recognition and loading images.
#include
#include
In the main, make sure you take the image filename and store it.
int main( int argc, char** argv )
{
//argc must include the program and the image filename
if( argc < 2 )
{
printf("my-recognition:  expected image filename as argument\n");
printf("example usage:   ./my-recognition my_image.jpg\n");
return 0;
}
// store the image filename
const char* imgFilename = argv[1];
To load the image from the disk use loadImage() function by storing image data pointer, image width and height as well.
uchar3* imgPtr = NULL;   //stores as RGB
int imgWidth   = 0;      // (in pixels)
int imgHeight  = 0;      // (in pixels)
// load the image from disk as uchar3 RGB (24 bits per pixel)
if( !loadImage(imgFilename, &imgPtr, &imgWidth, &imgHeight) )
{
printf("failed to load image '%s'\n", imgFilename);
return 0;
}
To load the image recognition network, use imageNet::Create() function . You can load different networks previously downloaded by writing imageNet::NETWORK_NAME inside Create function.
Do not forget to check whether the network loaded properly.
imageNet* net = imageNet::Create(imageNet::GOOGLENET);
if( !net )
{
printf("failed to load image recognition network\n");
return 0;
}
Now it is time to classify the images using imageNet::Classify() function by using image filename, sata pointer, width, height and confidence of classification which is between 0 and 1.
float confidence = 0.0;
const int classIndex = net->Classify(imgPtr, imgWidth, imgHeight, &confidence);
imageNet::Classify() returns the index of the object class, to get the description/name of the object use imageNet::GetClassDesc() function.
Finally, free the network’s resource before shutting down the program.
delete net;
return 0;
}
Next, create CMakeList.txt file to compile the code easier. You can simply copy and paste the following code.
# require CMake 2.8 or greater

cmake_minimum_required(VERSION 2.8)
# declare my-recognition project
project(my-recognition)

# import jetson-inference and jetson-utils packages.
# note that if you didn't do "sudo make install"
# while building jetson-inference, this will error.
find_package(jetson-utils)
find_package(jetson-inference)

# CUDA and Qt4 are required
find_package(CUDA)

# compile the my-recognition program
cuda_add_executable(my-recognition my-recognition.cpp)

# link my-recognition to jetson-inference library
target_link_libraries(my-recognition jetson-inference)
We must build our program before running. To do this, go into jetson-inference directory in the terminal and run docker/run.sh by allowing the docker access my-recognition directory as well.
cd ~/jetson-inference
docker/run.sh --volume ~/my-recognition:/my-recognition
While running, go to my-recognition directory.
Now you can run the project from the terminal by writing the following example code.
cd /my-recognition/
./my-recognition polar_bear.jpg

How to Code Your Own Image Recognition Program with Python
You can either use the previous directory that you have created for example using C++, or create a new directory and repeat the following steps.
mkdir ~/my-recognition
cd ~/my-recognition
touch my-recognition.py
chmod +x my-recognition.pytouch CMakeLists.txt
We added chmod +x command to make the file executable later.
Then you can download and add the pictures you want. Again, we used the same sample pictures.
Now, we can start editing our code. First, add the libraries needed to recognize and load the images and parsing the command line.
import jetson.inference
import jetson.utils
import argparse
Next, add the following code to parse the image filename and network name if a different network than GoogleNet would like to be use.
parser = argparse.ArgumentParser()
parser.add_argument("filename", type=str, help="filename of the image to process")
parser.add_argument("--network", type=str, default="googlenet", help="model to use, can be:  googlenet, resnet-18, ect. (see --help for others)")
opt = parser.parse_args()
To load images from the disk, you can use loadImage() function.
img = jetson.utils.loadImage(opt.filename)
The loaded image will be in the cudaImage format which contains memory address, size shape etc. You can find more information about cudaImage at
https://github.com/dusty-nv/jetson-inference/blob/master/docs/aux-image.md#image-capsules-in-python
.ptr      # memory address (not typically used)
.size     # size in bytes
.shape    # (height,width,channels) tuple
.width    # width in pixels
.height   # height in pixels
.channels # number of color channels
.format   # format string
.mapped   # true if ZeroCopy
To classify the image, we will first need to load imageNet object and the network.
net = jetson.inference.imageNet(opt.network)
Then, we can use the recognition network by using imageNet.Classify() function.
class_idx, confidence = net.Classify(img)
Finally, we need to interpret the results that describes the class of the image at the terminal. Use imageNet.GetClassDesc() function for this operation.
# find the object description
class_desc = net.GetClassDesc(class_idx)
# print out the result
print("image is recognized as '{:s}' (class #{:d}) with {:f}% confidence".format(class_desc, class_idx, confidence * 100))
Now, go to terminal to run our code. If you built the project from the source without using docker container, run the following command line directly while in the my-recognition directory.
cd my-recognition
my-recognition.py polar_bear.jpg
If you used docker container, run the docker by allowing the container to access my-recognition directory as well. Use --volume for this purpose
cd jetson-inference
docker/run.sh --volume ~/my-recognition:/my-recognition
Then, go to my-recognition directory inside the container and run the program.
cd my-recognition
my-recognition.py polar_bear.jpg

Thank you for reading our blog post.