How to Train SSD-Mobilenet Model for Object Detection using PyTorch?
WHAT YOU WILL LEARN?
1- How to Download the Dataset?
2- How to Train the SSD-Mobilenet Model?
3- How to Test Images with TensorRT for Object Detection?
ENVIRONMENT
Hardware: DSBOX-N2
OS: Jetpack 4.5
In this blog post, we will be explaining how to train a dataset with SSD-Mobilenet object detection model using PyTorch. You can review our DSBOX-N2 page to review the appropriate hardware.
We will be using jetson-inference project in this example. If you haven’t downloaded it, click here. While building up the project, do not forget to install PyTorch as well. If you haven’t installed PyTorch, you can type the following command.
cd jetson-inference/build
./install-pytorch.sh
If you used Docker container, it will be installed automatically. In this example we will use docker container, but you can use the same commands as well if you prefer to build the project from the source.
You should also import torch and torchvision. Execute the following commands on terminal by writing python or python3 first.
>>import torch
>>import torchvision
How To Download the Dataset?
In this project, we will download our dataset from Open Images webpage that includes variety of classes for object detection and segmentation.
We will run our operations under the jetson-inference/python/training/detection/ssd directory. First, go to jetson-inference and run the docker container.
docker/run.sh
Then, go to python/training/detection/ssd directory.
cd python/training/detection/ssd
Now, we can download our dataset. There are over 600 object classes provided in Open Images. You can see the class names in open_images_classes.txt file.
Run open_images_downloader.py script that downloads selected classes under the defined data directory.
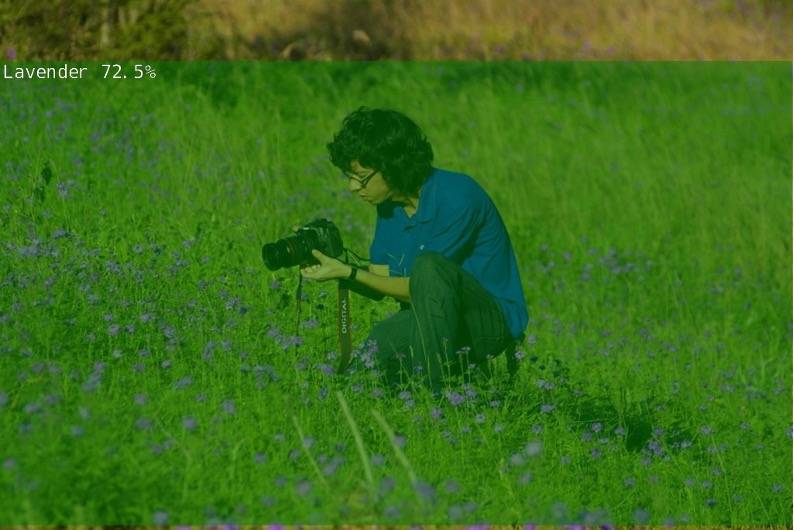
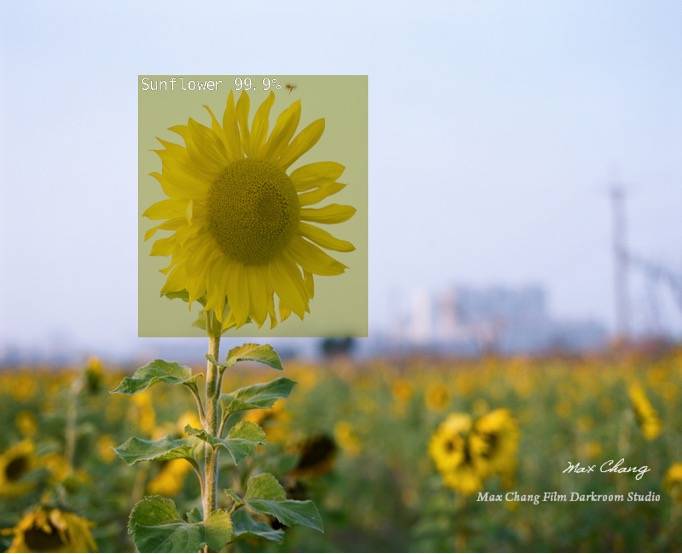
python3 open_images_downloader.py --class-names "Lavender,Sunflower" --data=data/flowers
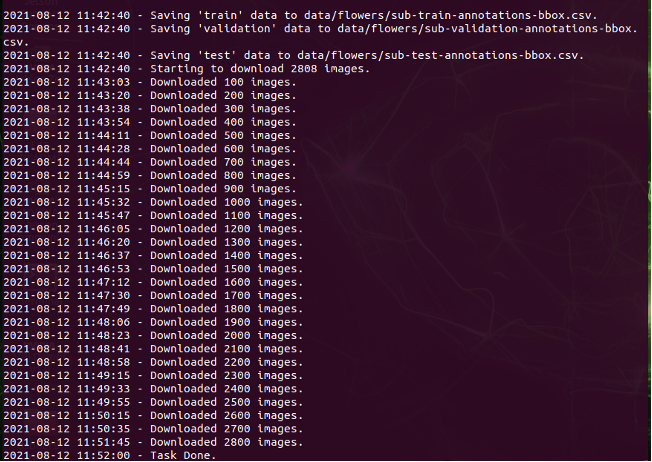
However, some classes may have huge amount of data, so be careful about the size when downloading. You can check the number of images by adding --stats-only command and see the statistics of each class without downloading the pictures.
python3 open_images_downloader.py --stats-only --class-names "Lavender,Sunflower" --data=data/flowers
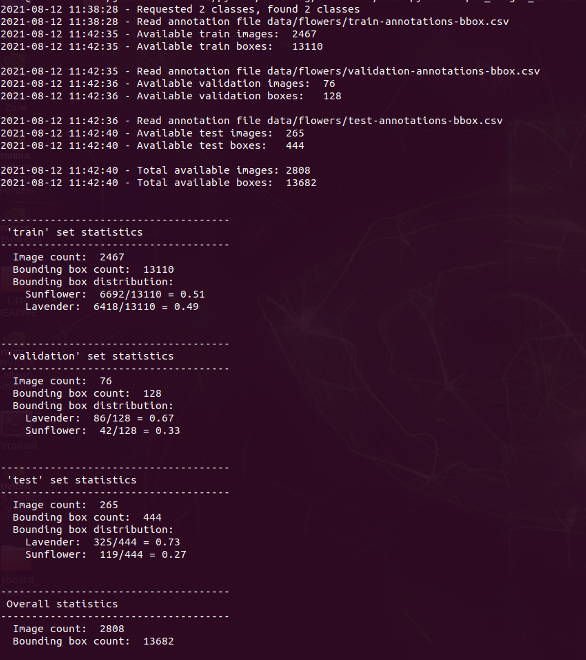
You can also limit the number of total images by --max-images and number of images per class by --max-annotations-per-class that will be downloaded to consume less time and storage. Make sure your dataset contains at least 1000 images to have a working model.
python3 open_images_downloader.py --max-images=2500 --class-names "Lavender,Sunflower" --data=data/flowers
How To Train the SSD-Mobilenet Model?
After downloading your dataset, you can move on to train the model by running train_ssd.py script.
python3 train.py --data=data/flowers --model-dir=models/flowers --batch-size=4 --workers=1 --epochs=2


The definitions of the arguments are given below:
• --data: Location where the data is stored. As a default, it is data/
• --model-dir: Location of the model that will be stored. As a default, it is models/
• --resume: If you stop training before it’s done, you can resume where you left with this flag
• --batch-size: How many images are processed at once. As a default, it is 4.
• --workers: Data loaders, default is 30.
• --epochs: The number of passes the entire set. Default is 2.
To reduce RAM, decrease –batch-size and –workers. To consume less time, decrease epochs but remember that it will also decrease the accuracy of the model.
If you still get the error killed during the training, try mounting 4 GB of swap space by running the following commands.
python3>> sudo systemctl disable nvzramconfig

>> sudo fallocate -l 4G /mnt/4GB.swap

>> sudo mkswap /mnt/4GB.swap

>> sudo swapon /mnt/4GB.swap
How to Test Images with TensorRT for Object Detection?
To use Tensor RT, we need to convert our model to an independent model format called ONNX.

After this, a model called ssd-mobilenet.onnx will be created under models/flowers/ .
Now, it is time to test our model with detectNet which is a program to detect objects. We can use test images that have downloaded with the dataset and save the outputs to test folder under jetson-inference/data.
detectnet --model=models/fruit/ssd-mobilenet.onnx --labels=models/fruit/labels.txt \
--input-blob=input_0 --output-cvg=scores --output-bbox=boxes \
"data/flowers/test/*.jpg" /jetson-inference/data/test/fruit_%i.jpg
You can also try it with a camera using the following sample codes. Do not forget to connect your camera before running the docker container.
CSI Camera:
detectnet --model=models/fruit/ssd-mobilenet.onnx --labels=models/fruit/labels.txt \
--input-blob=input_0 --output-cvg=scores --output-bbox=boxes \
csi://0
USB Camera:
detectnet --model=models/fruit/ssd-mobilenet.onnx --labels=models/fruit/labels.txt \
--input-blob=input_0 --output-cvg=scores --output-bbox=boxes \
/dev/video0
Thank you for reading our blog post.